KitchenAid Sorbet Recipe
I used to keep a small tub of sorbet in the freezer door for the week after Thanksgiving. By that time, everyone had eaten enough rich food. After dinner, I would pull it out and scoop it into small glasses, handing them out with a simple, “You’ll thank me later.”
They didn’t think much about the sorbet until my sister-in-law hosted the same post-holiday dinner a few years later. She needed a dessert that wasn’t another pie or plate of cookies.
While searching, she found my KitchenAid Sorbet Recipe on a card in an old cookbook. It was mostly in her handwriting, with some crossed-out measurements from earlier tries.
The first batch took longer to make because no one remembered to freeze the ice cream bowl the night before each batch; since then, it has gone smoother. Now, I make this sorbet specifically for nights when everyone at the table needs something lighter.

What the Egg White Does for a Smoother Texture
Adding a splash of whisked egg white to a fruit dessert might seem unusual, but it has an important purpose. Fruit sorbets made with just juice, sugar, and water can freeze into hard ice blocks because there isn’t much holding the ice crystals apart.
The egg white adds some protein and air, which helps make the texture smoother and lighter as it churns and freezes. Though it’s a small addition compared to the rest of the recipe, skipping it makes a noticeable difference in how the sorbet scoops when fully frozen.
Why I Keep Coming Back to This Homemade Sorbet
I keep making this since store-bought sorbet is often too sweet, and the actual citrus flavor doesn’t come through. Making it at home allows you to control how tart or sweet the sorbet will be, as you can taste the syrup before it goes into the machine.
This process is fairly quick for such an impressive dessert, especially when served in small glasses after a heavy meal. Most of the time is hands-off, as it involves chilling the syrup and letting the machine and freezer do their jobs.
Ingredients for KitchenAid Sorbet
- 3 lemons: Lemons are the key ingredient. They provide both juice and zest for flavor. Choose lemons that feel heavy for their size, as they usually have more juice. Organic lemons are better because the peels go in the syrup, and they have fewer pesticides.
- 1 ¾ cups cold water: This helps dilute the syrup to the right consistency and forms most of the mixture. Use filtered water to avoid any strong tastes from tap water. Starting with cold water helps the syrup cool faster after cooking.
- 1 cup granulated sugar: Sugar sweetens the sorbet and impacts its texture, as it prevents the mixture from freezing solid. Granulated sugar dissolves well in hot syrup. Taste the syrup before churning and adjust the sugar if it tastes too flat. The sweetness can vary depending on the tartness of the lemons.
- 1 pasteurized egg white: This ingredient makes the sorbet smoother and airier than just using fruit and syrup. Use a pasteurized egg or a carton egg white product since it doesn’t get cooked. Whisk it until foamy before adding it to the syrup to mix it in well.
Kitchen Tools That Make This Recipe Easier
- Citrus juicer: extracts lemon juice
- Saucepan: heats and dissolves syrup
- Fine-mesh strainer: removes pulp and seeds
- Whisk: whips egg white smooth
- Mixing bowl: chills the combined mixture
- KitchenAid stand mixer with ice cream attachment: churns the sorbet smooth
How to Make Sorbet in a KitchenAid Ice Cream Maker
1. Freeze the Ice Cream Bowl in Advance: Place the KitchenAid ice cream attachment bowl in the freezer at least 15 hours before you plan to churn, ideally the night before. Check that nothing shifts or sloshes inside it when you tilt it gently, which tells you it’s frozen solid all the way through.
2. Prep the Lemons: Wash the lemons well and pat them dry. Zest the peel from one or two of the lemons in wide strips using a peeler, avoiding the white pith underneath, then juice all three lemons and set the juice aside.
3. Make the Syrup: Combine the water, sugar, and lemon peels in a small saucepan and bring to a boil, stirring until the sugar fully dissolves. Remove from the heat and let the peels steep in the hot syrup for 15 minutes.
The syrup should turn a pale yellow and smell strongly of lemon by the time the steeping is done.
4. Strain and Cool: Strain the lemon juice into the syrup through a fine-mesh strainer to catch any seeds or pulp, then discard the lemon peels. Let the mixture cool to room temperature, then refrigerate it until fully chilled, about 1 hour.
5. Whisk the Egg White: Whisk the egg white in a separate small bowl until it turns foamy and slightly increases in volume. It doesn’t need to hold stiff peaks, just enough structure to blend smoothly into the chilled syrup.
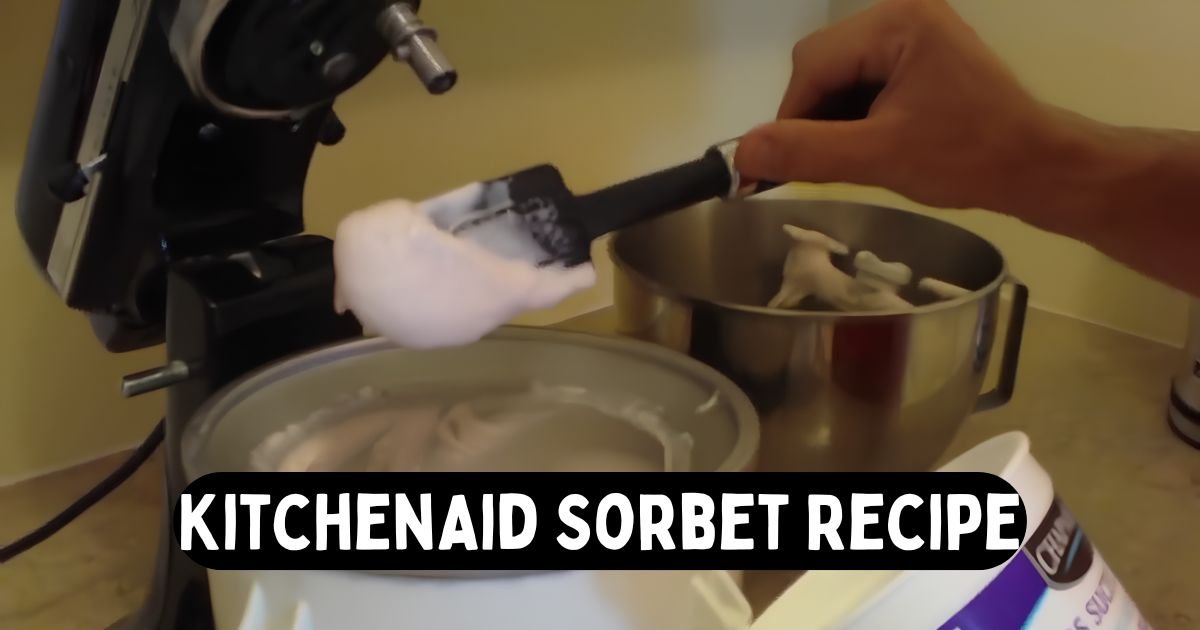
6. Combine and Churn: Whisk the egg white into the chilled lemon syrup, then pour the mixture into the frozen ice cream bowl fitted onto the stand mixer with the dasher attached. Churn for 30 to 40 minutes, until the sorbet thickens into a soft, slushy texture that holds loosely on a spoon.
If it’s still fully liquid after 40 minutes, the bowl likely wasn’t frozen solid enough beforehand; transfer the mixture to the freezer and stir it every 30 minutes until it firms up instead.
7. Freeze Until Firm: Transfer the churned sorbet to a freezer-safe container and freeze for at least 2 hours before serving, until it’s firm enough to hold a scoop shape rather than slump on the spoon.
My Best Tips for Smooth, Scoopable Sorbet
- Tart Sorbet: If the sorbet is too sour, the lemons might have been larger or more acidic than usual. Taste the syrup before churning and add a little sugar if needed.
- Icy Texture: If the sorbet is icy instead of smooth, it probably wasn’t chilled enough before churning. Chill it in the fridge for a full hour instead of churning it warm.
- Thickening Issue: If the sorbet doesn’t thicken in the machine, the bowl likely wasn’t frozen solid. Make sure it has been in the freezer for at least 15 hours before starting.
- Rock Hard Sorbet: If the finished sorbet is too hard, it may not have enough sugar. Sugar helps keep the texture scoopable.
- Flat Flavor: If the flavor seems flat, the peels probably weren’t steeped long enough. Let them sit off the heat for a full 15 minutes to infuse the oils.
- Eggy Taste: If the sorbet tastes eggy, you likely used too much egg white. Stick to one egg white for this batch size.
Easy Flavor Variations to Try
1. Lemon-Ginger Sorbet: Add a 1-inch piece of fresh ginger to the syrup while it steeps, then strain it out along with the peels. The ginger adds a warm, slightly spicy note that plays well against the tart lemon.
2. Raspberry Sorbet: Replace the lemon juice with a cup of raspberry puree, straining out the seeds first. The color turns a deep pink, and the flavor leans sweet-tart rather than purely tangy.
3. Mango Sorbet: Replace the lemon juice with a cup of mango puree for a sweeter, more tropical version. This one works well served after a spicy meal, since the sweetness helps cool things down.
4. Pineapple Sorbet: Swap in a cup of pineapple juice in place of the lemon juice. The result tastes bright and tropical, and pairs especially well with coconut-based desserts.
5. Strawberry Sorbet: Replace the lemon juice with a cup of strawberry puree for a fruitier, less tart result. Serve this one with a few fresh mint leaves on top for a simple garnish.
What to Serve With Lemon Sorbet
This sorbet is a great light dessert after a big meal because its tartness cuts through rich flavors. Pair it with a crisp cookie, like shortbread or biscotti, for some texture alongside the smooth sorbet.
A slice of pound cake or sponge cake works well too, especially with a small scoop of sorbet melting into the cake. Fresh berries or a simple fruit salad can also make a light pairing if you want a fruit-focused dessert. Add a few fresh mint leaves on top for color and a nice scent without much extra flavor.
For a warm-weather dinner, grill some fish or chicken, serve a light salad, and finish with a scoop of this sorbet instead of a heavy dessert. It clears the palate and keeps the meal feeling light.
How to Store Homemade Sorbet
Store the sorbet in a freezer-safe container that seals tightly. Press plastic wrap against the surface before closing the lid. This helps reduce ice crystals. The sorbet will stay good for up to 3 days.
However, it will get firmer the longer it’s in the freezer. If it’s been in there for more than a day, let it sit out for 10 to 15 minutes before scooping. If it’s too hard to scoop, run warm water over the outside of the container for a few seconds to soften the edges.
Avoid letting the sorbet completely melt and then refreezing it, as this will make it icy and grainy. Store the container at the back of the freezer, away from the door, where it stays colder.
KitchenAid Sorbet FAQs
1. Can I use a different citrus fruit instead of lemon?
Yes, you can use limes or oranges instead of lemon. Keep in mind that the flavor will change, so you might need to adjust the sugar since different fruits have different levels of tartness.
2. Is it safe to use raw egg white in this recipe?
It’s safer to use a pasteurized egg white, which you can get from a pasteurized whole egg or a carton of liquid egg whites. Regular raw egg white has a small risk of salmonella, so it’s better to choose pasteurized.
3. Can I make this sorbet without an ice cream maker?
Yes, pour the chilled mixture into a shallow container and freeze it. Stir every 30 minutes for the first few hours to break up ice crystals. The texture won’t be as smooth as if you used an ice cream maker, but it will be close.
4. Can I add mix-ins like fruit chunks or candy?
Yes, add them gently after the sorbet has finished churning, then freeze it like usual. Keep the pieces small; larger chunks can become hard and unpleasant to eat once frozen.
5. How long does the whole process take from start to finish?
It takes about 3 to 4 hours total, including churning and the final freeze. Most of that time is hands-off. Preparing the mixture, like juicing lemons and making the syrup, takes about 20 minutes.
6. Can I use a different sweetener instead of sugar?
Yes, you can use honey or maple syrup, but they will change the flavor a bit. Start with a smaller amount than the sugar called for, as they are sweeter, and adjust to taste.
7. How do I know when the sorbet is done churning?
It should have a thick, slushy consistency that holds its shape rather than being liquid. It won’t be fully firm yet; that happens in the final freeze.
8. Can I skip the egg white entirely?
Yes, the sorbet will still freeze and taste good without it, but the texture will be icier and less smooth. The egg white helps improve the final texture.

KitchenAid Sorbet Recipe
Make this easy KitchenAid Frozen Yogurt Recipe with creamy yogurt, milk, vanilla, and your favorite mix-ins for a tangy homemade summer treat.
Ingredients
- 2 cups plain full-fat yogurt
- 1 cup granulated sugar
- 1 teaspoon vanilla extract
- 1 cup whole milk
- 1 cup fruit, nuts, chocolate, or other mix-ins
Instructions
- Freeze the Ice Cream Bowl in Advance: Place the KitchenAid ice cream attachment bowl in the freezer at least 15 hours before you plan to churn, ideally the night before. Check that nothing shifts or sloshes inside it when you tilt it gently, which tells you it's frozen solid all the way through.
- Prep the Lemons: Wash the lemons well and pat them dry. Zest the peel from one or two of the lemons in wide strips using a peeler, avoiding the white pith underneath, then juice all three lemons and set the juice aside.
- Make the Syrup: Combine the water, sugar, and lemon peels in a small saucepan and bring to a boil, stirring until the sugar fully dissolves. Remove from the heat and let the peels steep in the hot syrup for 15 minutes. The syrup should turn a pale yellow and smell strongly of lemon by the time the steeping is done.
- Strain and Cool: Strain the lemon juice into the syrup through a fine-mesh strainer to catch any seeds or pulp, then discard the lemon peels. Let the mixture cool to room temperature, then refrigerate it until fully chilled, about 1 hour.
- Whisk the Egg White: Whisk the egg white in a separate small bowl until it turns foamy and slightly increases in volume. It doesn't need to hold stiff peaks, just enough structure to blend smoothly into the chilled syrup.
- Combine and Churn: Whisk the egg white into the chilled lemon syrup, then pour the mixture into the frozen ice cream bowl fitted onto the stand mixer with the dasher attached. Churn for 30 to 40 minutes, until the sorbet thickens into a soft, slushy texture that holds loosely on a spoon. If it's still fully liquid after 40 minutes, the bowl likely wasn't frozen solid enough beforehand; transfer the mixture to the freezer and stir it every 30 minutes until it firms up instead.
- Freeze Until Firm: Transfer the churned sorbet to a freezer-safe container and freeze for at least 2 hours before serving, until it's firm enough to hold a scoop shape rather than slump on the spoon.
Nutrition Information:
Serving Size: 1Amount Per Serving: Calories: 270
A few spoonfuls of this KitchenAid Sorbet Recipe clean the palate as a good sorbet should. It’s tart enough to contrast with any sweet dish served alongside.
Using organic lemons is worth it, as the peels add much flavor along with the juice.